2019

Thursday, December 26, 2019

Logstash Tutorial : A complete guide for the beginners how to index data from logstash to Elasticsearch and Kibana


Logstash is an open-source, server-side data processing pipeline that ingests data from many sources at once, transforms it, and then sends it to your favourite "stash" — most commonly Elasticsearch.

Logstash data processing pipeline logo
Logstash

The below topics are covered in this blog -

1) Overview of Logstash
2) What is Logstash?
3) Installing Logstash
4) Downloading a sample dataset
5) How to run Logstash
6) A complete simple.conf example

1. Overview of Logstash

Developed by: Elastic NV. Logstash is one of the three core components of the Elastic (ELK) stack, alongside Elasticsearch and Kibana.

2. What is Logstash?

Logstash is a lightweight, open-source, server-side data processing pipeline that lets you collect data from a variety of sources, transform it on the fly, and send it to your chosen destination. It is most often used as the data pipeline for Elasticsearch. Thanks to its tight Elasticsearch integration, powerful log-processing capabilities, and a large ecosystem of pre-built plugins, Logstash is a popular choice for loading data into Elasticsearch.

Logstash pipeline diagram showing inputs, filters and outputs
The Logstash Pipeline — Inputs, Filters, Outputs

3. Installing Logstash

Download Logstash from the official Elastic site. Always match the Logstash version to your Elasticsearch version:

https://www.elastic.co/downloads/logstash

4. Download a Dataset to Import into Elasticsearch

You can grab a free sample dataset from Kaggle. This tutorial uses the IBM HR Analytics employee attrition dataset:

https://www.kaggle.com/datasets

5. How to Run Logstash

A Logstash pipeline has three stages: input (where the data comes from), filter (how it is parsed and transformed), and output (where it goes). At its simplest:

input {
  stdin { }
}

filter { }

output {
  elasticsearch { hosts => ["localhost:9200"] }
  stdout { codec => rubydebug }
}

Save the file with a .conf extension, then run it from your Logstash folder:

bin/logstash -f simple.conf     # simple.conf is your config file name

Official configuration reference: Logstash configuration guide.

6. A Complete simple.conf Example

This config reads a CSV, converts the numeric columns to integers, and indexes the result into Elasticsearch. Update the path to point at your own CSV file.

input {
  file {
    path => "/path/to/your/employee.csv"
    start_position => "beginning"
    sincedb_path => "NUL"
  }
}

filter {
  csv {
    separator => ","
    columns => [ "Age","Attrition","BusinessTravel","DailyRate","Department",
      "DistanceFromHome","Education","EducationField","EmployeeCount",
      "EmployeeNumber","EnvironmentSatisfaction","Gender","HourlyRate",
      "JobInvolvement","JobLevel","JobRole","JobSatisfaction","MaritalStatus",
      "MonthlyIncome","MonthlyRate","NumCompaniesWorked","Over18",
      "OverTime","PercentSalaryHike","PerformanceRating",
      "RelationshipSatisfaction","StandardHours","StockOptionLevel",
      "TotalWorkingYears","TrainingTimesLastYear","WorkLifeBalance",
      "YearsAtCompany","YearsInCurrentRole","YearsSinceLastPromotion",
      "YearsWithCurrManager" ]
  }

  mutate {
    convert => {
      "Age" => "integer"
      "DailyRate" => "integer"
      "DistanceFromHome" => "integer"
      "Education" => "integer"
      "EmployeeCount" => "integer"
      "EmployeeNumber" => "integer"
      "EnvironmentSatisfaction" => "integer"
      "HourlyRate" => "integer"
      "JobInvolvement" => "integer"
      "JobLevel" => "integer"
      "JobSatisfaction" => "integer"
      "MonthlyIncome" => "integer"
      "MonthlyRate" => "integer"
      "NumCompaniesWorked" => "integer"
      "PercentSalaryHike" => "integer"
      "PerformanceRating" => "integer"
      "RelationshipSatisfaction" => "integer"
      "StandardHours" => "integer"
      "StockOptionLevel" => "integer"
      "TotalWorkingYears" => "integer"
      "TrainingTimesLastYear" => "integer"
      "WorkLifeBalance" => "integer"
      "YearsAtCompany" => "integer"
      "YearsInCurrentRole" => "integer"
      "YearsSinceLastPromotion" => "integer"
      "YearsWithCurrManager" => "integer"
    }
  }
}

output {
  elasticsearch {
    hosts => "localhost:9200"
    index => "employee"
  }
  stdout { }
}

Clone the full project:

git clone https://bitbucket.org/atique1224/youtube_logstash_tutorial.git

7. Video Walkthrough


About the Author
Atique Ahmed — Principal AI Architect. 7x Microsoft MVP and Guinness World Record holder for Programming Excellence. Founder of Codez Tech.
Portfolio  |  LinkedIn  |  GitHub

Kibana Tutorial : A Complete guide for the beginners


Kibana is an open-source data visualisation dashboard for Elasticsearch. It provides visualisation on top of the content indexed in an Elasticsearch cluster — users can build bar, line, and scatter plots, pie charts, and maps over large volumes of data.

Kibana data visualisation dashboard for Elasticsearch
Kibana

The below topics are covered in this blog -

1) Overview of Kibana
2) What is Kibana?
3) Installing Kibana
4) Indexing data into Kibana
5) GET, POST, PUT, DELETE from Kibana Dev Tools
6) Elasticsearch aggregation and projection
7) Elasticsearch pagination and scroll
8) Visualising Elasticsearch data in Kibana

1. Overview of Kibana

Kibana also includes a presentation tool called Canvas, which lets users build slide decks that pull live data directly from Elasticsearch. The combination of Elasticsearch, Kibana, and Logstash is known as the ELK Stack.

Developed by: Elastic NV.

2. What is Kibana?

Kibana is a data visualisation and management tool for Elasticsearch that provides real-time histograms, line graphs, pie charts, maps, and other diagrams.

3. Installing Kibana

Download Kibana from the official Elastic site. Always match the Kibana version to your Elasticsearch version:

https://www.elastic.co/downloads/kibana

4. Indexing Data into Kibana

When you index data into Elasticsearch, run Kibana alongside it so the data becomes available to both. Clone the project:

git clone https://bitbucket.org/atique1224/youtube_elasticsearch_indexing_tutorial.git

Reference tools used in this tutorial: Node.js, Visual Studio Code, MongoDB, and Robo 3T.

5. GET, POST, PUT, DELETE from Kibana Dev Tools

Kibana's Dev Tools console lets you run REST requests against Elasticsearch directly. Clone the project:

git clone https://bitbucket.org/atique1224/youtube_kibana_tutorial.git

6. Elasticsearch Aggregation and Projection

Aggregation lets you compute summaries over your data — sums, counts, and grouped buckets.

# Aggregation with a sum query
GET /students/_search
{
  "query": {
    "match_all": {}
  },
  "aggs": {
    "Casual_Leaves": {
      "sum": { "field": "leaves.CL" }
    }
  }
}

# Aggregation with a terms bucket (count of repeated values)
GET /students/_search
{
  "query": {
    "match_all": {}
  },
  "aggs": {
    "count": {
      "terms": {
        "field": "dept.keyword",
        "size": 100,
        "order": { "_key": "desc" }
      }
    }
  }
}

# Total count of records
GET /students/_count
{
}

Projection returns only the fields you ask for, using _source:

# Return only selected fields
GET /students/_search
{
  "_source": ["student_id", "skills"],
  "query": {
    "match_all": {}
  }
}

7. Elasticsearch Pagination and Scroll

Pagination. Suppose you have a huge index — ten million records or more. Returning them all to the frontend in one shot is not possible, so Elasticsearch offers two solutions. The first is pagination, using from and size to fetch one page at a time.

# Page through results: 10 at a time, starting at record 20
GET /students/_search
{
  "from": 20,
  "size": 10,
  "query": {
    "match_all": {}
  }
}

Scroll. The second solution is the scroll API. Each request creates a scroll ID and you set an expiry time, after which that scroll ID expires. It is designed for deep, sequential retrieval of large result sets rather than user-facing paging.

# Open a scroll that stays valid for 1 minute
GET /students/_search?scroll=1m
{
  "size": 1000,
  "query": {
    "match_all": {}
  }
}

# Fetch the next batch using the returned _scroll_id
GET /_search/scroll
{
  "scroll": "1m",
  "scroll_id": "PASTE_YOUR_SCROLL_ID_HERE"
}

Note: for deep pagination in current Elasticsearch, the search_after parameter with a point-in-time (PIT) is now the recommended approach over scroll for most use cases. Scroll still works but is considered legacy for real-time paging.

8. Visualising Elasticsearch Data in Kibana

To visualise Elasticsearch data, the data must first be present in Kibana, and you need to create an index pattern for the relevant indices. Good visualisations also depend on good data — the "4 Cs" of data quality:

  • Correctness — validate data accuracy against an external reference.
  • Currency — deliver new and updated content in a timely manner.
  • Completeness — provide the right attributes and analysis so users have all the information they need to make decisions.
  • Consistency — standardise identifiers and content across databases and products, so users get consistent information regardless of platform.

About the Author
Atique Ahmed — Principal AI Architect. 7x Microsoft MVP and Guinness World Record holder for Programming Excellence. Founder of Codez Tech.
Portfolio  |  LinkedIn  |  GitHub

Elasticsearch Tutorial : A Complete guide for the beginners


Elasticsearch is a highly scalable, open-source, full-text search and analytics engine. It lets you store, search, and analyse large volumes of data quickly and in near real time. It is generally used as the underlying engine that powers applications with complex search requirements. Elasticsearch builds a distributed system on top of Apache Lucene for indexing and automatic type guessing, and exposes Lucene's features through a JSON-based REST API.

Elasticsearch search and analytics engine logo
Elasticsearch

The below topics are covered in this blog -

1) Overview of Elasticsearch
2) SQL vs NoSQL
3) Relational vs non-relational databases
4) Scale up vs scale out
5) What is Elasticsearch?
6) How does Elasticsearch work?
7) Real-time example — Case 1
8) Real-time example — Case 2
9) Companies using Elasticsearch
10) Installing Elasticsearch
11) Bulk indexing from MongoDB to Elasticsearch
12) Elasticsearch with Node.js

1. Overview of Elasticsearch

Developed by: Elastic NV, first released on 8 February 2010.

Features:

  • Data storage and a document store for unstructured data
  • Flexible data types and full-text search
  • Field- and document-level APIs
  • Cluster indices, data snapshots, and rollup indices
  • Elasticsearch SQL and role-based access control

2. SQL vs NoSQL

Before going deeper into Elasticsearch, it helps to understand SQL and NoSQL, because the distinction is central to how Elasticsearch scales.

  • SQL databases scale vertically — to grow, you increase the capacity (CPU, RAM) of a single server.
  • NoSQL databases scale horizontally — to grow, you add more servers.

3. Relational vs Non-Relational Databases

In a relational (scale-up) database you have primary keys, secondary keys, and foreign keys, along with joins — left outer join, right outer join, full join, and so on. As the data grows on a single server, you increase that server's RAM and CPU.

In a non-relational (scale-out) database there is no join concept. Instead of increasing the power of one server, you add more servers to share the load.

4. Scale Up vs Scale Out

Why cover all this in a post about Elasticsearch? Because Elasticsearch is a NoSQL, scale-out database, and understanding scale-out is what makes the rest of it make sense. Rather than growing one machine, Elasticsearch distributes data and load across many nodes.

5. What is Elasticsearch?

Elasticsearch is an open-source, RESTful, distributed search and analytics engine built on Apache Lucene. Since its release it has become one of the most popular search engines, commonly used for log analytics, full-text search, security intelligence, business analytics, and operational intelligence.

6. How Does Elasticsearch Work?

Raw data flows into Elasticsearch from a variety of sources — logs, system metrics, web applications, and more. During ingestion, this raw data is parsed, normalised, and enriched before being indexed. Once indexed, you can run complex queries against it and use aggregations to retrieve rich summaries. From Kibana, you can then build visualisations, share dashboards, and manage the Elastic Stack.

7. Real-Time Example — Case 1

Consider the basic architecture of a web application dealing with a huge amount of data. The frontend is a web browser. When a user searches, if a large volume of data sits in a traditional database, it becomes difficult to return relevant results quickly. This is exactly where Elasticsearch comes in — it sits alongside the primary database and serves fast search results.

Web application architecture using Elasticsearch for search
Real-Time Example — Case 1

8. Real-Time Example — Case 2

In the second scenario, when you have a large amount of data to work with and surface to the frontend, Elasticsearch again fits well. And once your data is in Elasticsearch, you can visualise it through Kibana as a pie chart, bar chart, table, and more.

Elasticsearch with Kibana visualisation architecture
Real-Time Example — Case 2

These are just two examples. There are countless reasons and challenges you will face when dealing with big data — and those help you decide when and where Elasticsearch and Kibana fit into the picture.

9. Companies Using Elasticsearch

Many well-known companies use Elasticsearch, Kibana, Logstash, and Filebeat, including Cisco, SAP, IBM, Citrix, Meta (Facebook), LinkedIn, Microsoft, Red Hat, Adobe, EA, Bosch, eBay, Flipkart, and others.

Is it free? Yes — Elasticsearch is free for many features and services under its open-source and free tiers, with paid options for advanced capabilities.

10. Installing Elasticsearch

Download Elasticsearch from the official Elastic site. Match the version to your Kibana and Logstash versions:

https://www.elastic.co/downloads/elasticsearch

11. Bulk Indexing from MongoDB to Elasticsearch

This section indexes bulk data from MongoDB into Elasticsearch. Clone the project:

git clone https://bitbucket.org/atique1224/youtube_elasticsearch_indexing_tutorial.git

Reference tools: Node.js, Visual Studio Code, MongoDB, and Robo 3T.

12. Elasticsearch with Node.js — Aggregation and CRUD

This section covers using Elasticsearch from Node.js: aggregations and the GET, POST, PUT, and DELETE methods. Clone the project:

git clone https://bitbucket.org/atique1224/youtube_elasticsearch_with_node_js_tutorial.git

About the Author
Atique Ahmed — Principal AI Architect. 7x Microsoft MVP and Guinness World Record holder for Programming Excellence. Founder of Codez Tech.
Portfolio  |  LinkedIn  |  GitHub

Tuesday, December 24, 2019

Mongodb: A complete guide about MongoDB, MongoDB with Node JS, Mongodb Replication and shading concept


Most people meet MongoDB believing it is "SQL without the schema" — a place to dump JSON when you can't be bothered to design tables. That framing is why so many MongoDB projects rot into slow, inconsistent, un-queryable blobs a year in.

MongoDB is not a schema-less escape hatch. It is a document database that rewards you for modelling around how your application reads and writes data, not around normalized relations. Get that one idea right and everything below — indexing, aggregation, replication, sharding — falls into place.

MongoDB complete guide
MongoDB — Document Model, Querying, Scaling

The below topics are covered in this blog -

1. What MongoDB actually is
2. How MongoDB stores data (vs an RDBMS)
3. When to reach for MongoDB — and when not to
4. Inserting data
5. Reading data: find, projection, $and / $or
6. Sort, count, skip & limit
7. Updating data
8. Deleting data
9. Indexing — the difference between fast and unusable
10. Aggregation pipelines
11. Replication & high availability
12. Sharding & horizontal scale
13. Backup & restore
14. Connecting MongoDB from Node.js
15. Common Mistakes
16. The Takeaway

1. What MongoDB actually is

MongoDB is an open-source, document-oriented NoSQL database first released in 2009 by the company now called MongoDB, Inc. Instead of rows in tables, it stores documents — JSON-like structures — grouped into collections. On disk those documents are held as BSON (Binary JSON), which adds types JSON lacks, such as native dates, 64-bit integers, and binary data.

The practical consequence: a single document can hold nested objects and arrays, so data your application uses together can be stored together and fetched in one read — no joins across five tables to render one screen.

2. How MongoDB stores data (vs an RDBMS)

A relational database stores data in tables with a fixed, pre-declared schema and uses SQL plus foreign keys to relate rows across tables. MongoDB stores self-contained documents whose shape you can vary field-by-field, and it favours embedding related data over splitting it across collections.

Dimension Relational (RDBMS) MongoDB
Unit of storageRow in a tableDocument in a collection
SchemaFixed, declared up frontFlexible per document (still worth designing)
RelationshipsJoins on foreign keysEmbedding, or references + $lookup
Read patternAssemble from many tablesOne document, one read (when modelled well)
ScalingVertical first; sharding is hardHorizontal via native sharding
TransactionsMature, multi-row defaultMulti-document transactions supported (since 4.0)
Best fitComplex relational integrity, reportingEvolving shapes, high write volume, nested data
Worst fitRapidly changing, sparse schemasHeavy ad-hoc cross-entity joins

3. When to reach for MongoDB — and when not to

Good fits: content management and catalogs, e-commerce product data with varying attributes, user profiles and activity feeds, social and messaging data, IoT / event ingestion where write throughput matters, and any domain where the document shape genuinely differs row to row.

Think twice when your core workload is heavy multi-entity joins, strict cross-table financial integrity, or complex ad-hoc reporting — a relational engine is usually the calmer choice there. "We might need to scale" is not, by itself, a reason to pick MongoDB.

4. Inserting data

Insert a single document, or many at once:

// one document
db.employee.insertOne({
  emp_id: 1,
  name: "Atique",
  age: 30,
  dept: "IT",
  skills: ["nodejs", "angular", "mongodb"],
  leaves: { CL: 10, SL: 10, PL: 21 }
})

// many documents
db.employee.insertMany([
  { emp_id: 2, name: "Sunny", dept: "Testing", skills: ["jira"] },
  { emp_id: 3, name: "Sonu",  dept: "IT",      skills: ["nodejs", "mongodb"] }
])

5. Reading data: find, projection, $and / $or

The second argument to find() is the projection — ask only for the fields you need, never the whole document out of habit:

// filter + projection (1 = include, 0 = exclude)
db.employee.find({ dept: "IT" }, { name: 1, skills: 1, _id: 0 })

// OR
db.employee.find({ $or: [ { age: { $gt: 40 } }, { emp_id: { $gt: 10 } } ] }).count()

// AND
db.employee.find({ $and: [ { age: { $gt: 40 } }, { emp_id: { $gt: 10 } } ] }).count()

6. Sort, count, skip & limit

These chain onto a cursor and are the backbone of pagination:

db.employee.find().sort({ email: -1 })   // -1 descending, 1 ascending
db.employee.find({}).count()
db.employee.find().skip(10).limit(10)    // page 2 at 10 per page

One caveat worth knowing early: skip() on large offsets is expensive because the server still walks the skipped documents. For deep pagination, page on an indexed field with a range filter instead of a large skip.

7. Updating data

db.employee.updateOne({ emp_id: 42 }, { $set: { dept: "HR" } })
db.employee.updateMany({ dept: "HR" }, { $set: { dept: "IT" } })

// replaceOne swaps the whole document (except _id) - use with care
db.employee.replaceOne({ dept: "business" }, { dept: "sales" })

Always pair an update filter with the field you intend to change via $set. A common accident is passing a bare document to an update and wiping every other field.

8. Deleting data

db.employee.deleteOne({ dept: "HR" })
db.employee.deleteMany({ dept: "business" })

9. Indexing — the difference between fast and unusable

Without an index, MongoDB scans every document in a collection to satisfy a query — a collection scan. On a few hundred documents you won't notice. On a few hundred thousand, your query is a full table read on every request.

// create an index (ascending)
db.employee.createIndex({ emp_id: 1 })

// compound index - order of fields matters for which queries it serves
db.employee.createIndex({ dept: 1, age: -1 })

// drop an index
db.employee.dropIndex({ emp_id: 1 })

// see whether a query used an index or scanned everything
db.employee.find({ emp_id: 500 }).explain("executionStats")

Note: createIndex() is the current method. The old ensureIndex() you'll see in older tutorials is deprecated — it still works as an alias, but write new code with createIndex(). Reach for explain() whenever a query feels slow; it tells you the truth about index use.

10. Aggregation pipelines

Aggregation is MongoDB's answer to SQL's GROUP BY plus much more — a pipeline of stages where each stage transforms the stream of documents and hands it to the next.

// count documents per gender
db.school.aggregate([
  { $group: { _id: "$gender", total: { $sum: 1 } } }
])

// max / min age per gender
db.school.aggregate([
  { $group: { _id: "$gender", oldest: { $max: "$age" }, youngest: { $min: "$age" } } }
])

// a fuller pipeline: filter, then group, then sort
db.orders.aggregate([
  { $match: { status: "paid" } },
  { $group: { _id: "$customerId", spend: { $sum: "$amount" } } },
  { $sort: { spend: -1 } },
  { $limit: 10 }
])

11. Replication & high availability

Replication keeps synchronized copies of your data across multiple servers, called a replica set. One node is the primary (takes all writes); the rest are secondaries that copy the primary's operation log.

The primary emits a heartbeat. If the secondaries stop hearing it, they hold an election and promote one of themselves to primary — automatic failover with no data loss for acknowledged writes. This is what protects you from losing a single server, and it's why production MongoDB is essentially always a replica set, never a standalone node.

MongoDB replication and failover
MongoDB Replication — primary, secondaries, and failover

12. Sharding & horizontal scale

When one machine can no longer hold the data or serve the read/write throughput, sharding spreads the data across many machines — horizontal scaling. Each shard is itself a replica set. A mongos router sits in front and, using the shard key, decides which shard a given query or write belongs to.

The shard key is the single most important design decision here. A poorly chosen key funnels most traffic to one shard (a "hot shard") and you lose the benefit of scaling out. Choose a key with high cardinality and even access distribution.

13. Backup & restore

For logical backups, mongodump writes BSON dumps and mongorestore reads them back:

# entire server
mongodump
mongorestore

# a single database
mongodump --db mongodbTutorial
mongorestore --db mongodbTutorial dump/mongodbTutorial

# a single collection
mongodump --db mongodbTutorial --collection school
mongorestore --db mongodbTutorial --collection school dump/mongodbTutorial/school.bson

For anything production-grade, prefer a real backup strategy — scheduled snapshots, or MongoDB Atlas continuous backups — over a manual mongodump you have to remember to run.

14. Connecting MongoDB from Node.js

The common path in a Node app is Mongoose. Keep the connection in its own module and export it:

// db.js
const mongoose = require("mongoose");

mongoose.connect(process.env.MONGODB_URI)
  .then(() => console.log("MongoDB connected..."))
  .catch((err) => console.error("DB connection error:", err));

module.exports = mongoose;

Two modern notes on older tutorials: the useNewUrlParser and useUnifiedTopology options are no longer needed on current driver versions, and the connection string belongs in an environment variable, never hardcoded with an IP and port in source.

15. Common Mistakes

1. Treating "schema-less" as "design-less." MongoDB lets you skip a schema; it does not reward you for it. Model documents around your read patterns or you'll pay for it in every query later.

2. Querying without indexes. The demo runs fine, then production melts under collection scans. Index the fields you filter and sort on, and confirm with explain().

3. Unbounded array growth inside a document. Embedding is great until a document grows without limit (comments, events). Documents have a 16MB cap — past a point, reference a separate collection instead.

4. Choosing a low-cardinality shard key. Sharding on something like country or a boolean creates hot shards. Pick a key that spreads load evenly.

5. Running a standalone node in production. No replica set means no failover and no safe backups. A single mongod is for local development only.

16. The Takeaway

MongoDB pays off when you model with intent: shape documents around how the app reads them, index for your real queries, run a replica set for safety, and reach for sharding only when a single machine genuinely can't cope. The flexibility is real — but it's a tool for good design, not a substitute for it.

About the author

I'm Atique Ahmed, Principal AI Architect — 7x Microsoft MVP and a Guinness World Record holder for Programming Excellence. I write about GenAI, agentic AI, and the systems that hold real applications together.

Find more at atiqueahmed.com · LinkedIn · GitHub

Monday, December 23, 2019

Node.js : The Complete Guide to Build RESTFUL APIs


Most people describe Node.js as "JavaScript on the server" and stop there — as if the only new idea is where the code runs. That framing misses the point and is why so many Node apps end up slow, tangled in callbacks, or mysteriously freezing under load.

Node.js isn't just JavaScript moved to the backend. It's a single-threaded, event-driven runtime built around non-blocking I/O — and almost everything that surprises people about it follows from that one design choice. Understand the event loop and the rest of Node stops being mysterious.

Node.js complete guide
Node.js — Event-Driven, Non-Blocking, Single-Threaded

The below topics are covered in this blog -

1. What Node.js actually is
2. Client-side vs server-side
3. Why Node.js — non-blocking I/O
4. The event loop: how one thread handles many requests
5. Installing Node.js (and why to use nvm)
6. A first server
7. Scheduling: setTimeout, setInterval, setImmediate, process.nextTick
8. Callbacks
9. Promises
10. async / await
11. Express
12. Common Mistakes
13. The Takeaway

1. What Node.js actually is

Node.js is a runtime that lets JavaScript run outside the browser, created by Ryan Dahl in 2009. It runs on top of Google's V8 engine (the same one in Chrome) and adds what a server needs that a browser doesn't — a file system, networking, processes, and streams.

The defining feature is its concurrency model: asynchronous, event-driven, non-blocking I/O. When Node hits an I/O operation — a database query, a file read, a network call — it doesn't sit and wait. It starts the operation, moves on to other work, and comes back when the result is ready. That's what lets a single Node process handle thousands of concurrent connections.

2. Client-side vs server-side

Client-side code runs in the user's browser — HTML, CSS, and the JavaScript behind frameworks like Angular, React, and Vue. It renders the interface and reacts to the user, but it can't talk to a database or hold shared state between users.

Server-side code runs on a machine you control. It owns the database, authentication, business logic, and anything that must be trusted or shared. Node.js sits here alongside Java, .NET, PHP, Go, and Python — with the distinction that the language is the same JavaScript your front end already uses, so one team can work across the whole stack.

3. Why Node.js — non-blocking I/O

Picture a restaurant with one waiter. In a blocking model, the waiter takes table 1's order, walks it to the kitchen, and then stands there until the food is cooked before serving anyone else. Table 2 waits the whole time. In a non-blocking model, the waiter takes table 1's order, hands it to the kitchen, and immediately goes to table 2 — picking food up whenever a kitchen is done. One waiter, many tables served.

Node is the second waiter. The same file read, written two ways:

const fs = require("fs");

// BLOCKING - nothing else runs until the file is read
const data = fs.readFileSync("big.txt", "utf8");
console.log(data);
console.log("this waits");

// NON-BLOCKING - Node continues, callback fires when ready
fs.readFile("big.txt", "utf8", (err, data) => {
  if (err) throw err;
  console.log(data);
});
console.log("this runs immediately, before the file is read");

4. The event loop: how one thread handles many requests

Node runs your JavaScript on a single thread. When a request needs I/O, Node hands that work off (to the operating system or to libuv's background thread pool) and keeps processing other requests. When the I/O finishes, its callback is placed on a queue, and the event loop — which is constantly watching that queue — runs it. This is how one thread stays busy instead of blocked.

A crucial nuance the old "Node is single-threaded" slogan misses: the event loop is single-threaded, but Node is not helpless at parallelism. I/O uses a background thread pool, and for genuinely CPU-heavy work you can spin up worker_threads. The rule of thumb: I/O-bound work is where Node shines; CPU-bound work needs care so it doesn't block the loop.
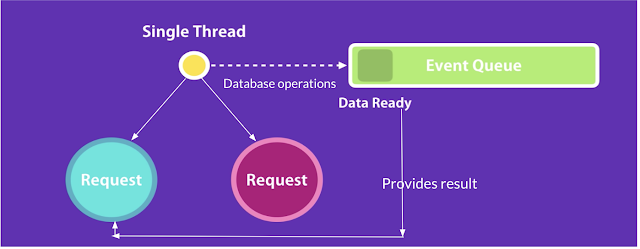
Node.js single thread and event loop
Node.js — one thread, an event queue, and the loop that drains it

5. Installing Node.js (and why to use nvm)

You can download Node directly from nodejs.org (Windows / macOS / Linux). But the better first move is a version manager, so you can switch Node versions per project without reinstalling:

# macOS / Linux - nvm
nvm install --lts
nvm use --lts
node -v
npm -v

# Windows - nvm-windows (github.com/coreybutler/nvm-windows)
nvm install lts
nvm use lts

Stick to the current LTS ("Long Term Support") release for anything real — it's the line that receives stability and security fixes.

6. A first server

Node ships with an HTTP module, so a working server needs no dependencies at all:

const http = require("http");

const server = http.createServer((req, res) => {
  res.writeHead(200, { "Content-Type": "text/plain" });
  res.end("Hello from Node.js");
});

server.listen(3000, () => console.log("Listening on http://localhost:3000"));

One note on module syntax: the require() style above is CommonJS, still everywhere in Node. Modern Node also supports ES modules — import http from "node:http" — when your package.json sets "type": "module". New projects increasingly use ESM.

7. Scheduling: setTimeout, setInterval, setImmediate, process.nextTick

Node gives you several ways to defer work, and they run at different points in the loop. Getting the ordering wrong is a classic source of "why did this log first?" confusion.

Function When it runs Repeats? Typical use
process.nextTick()Before the loop continues, after the current operationNoRun something right after current code, before any I/O
queueMicrotask()Microtask queue, after nextTickNoPromise-style deferral without a full timer
Promise .then()Microtask queueNoAsync result handling
setTimeout(fn, 0)Timers phase, next loop iterationNoDefer by a minimum delay
setInterval(fn, ms)Timers phase, every msYesRecurring work — clear it when done
setImmediate()Check phase, after I/O callbacksNoRun right after the current I/O cycle
console.log("start");
setTimeout(() => console.log("setTimeout"), 0);
setImmediate(() => console.log("setImmediate"));
process.nextTick(() => console.log("nextTick"));
Promise.resolve().then(() => console.log("promise"));
console.log("end");

// typical order:
// start, end, nextTick, promise, setTimeout, setImmediate

The lesson isn't to memorize the order — it's that nextTick and microtasks jump ahead of timers, and abusing process.nextTick() can starve the loop.

8. Callbacks

A callback is a function you pass to another function to be run when its work finishes — the original way Node expressed "do this, then that." The convention is error-first: the first argument is the error (or null), the second is the result.

fs.readFile("data.json", "utf8", (err, data) => {
  if (err) return console.error("failed:", err);
  console.log("got:", data);
});

Callbacks work, but nesting several of them — read a file, then query a DB, then call an API — produces the deeply indented "callback hell" that's hard to read and easy to get wrong. That pain is exactly what Promises were introduced to fix.

9. Promises

A Promise represents a value that will exist eventually. Instead of nesting, you chain — and errors flow to a single .catch() instead of being checked at every step.

fs.promises.readFile("data.json", "utf8")
  .then((data) => JSON.parse(data))
  .then((obj) => console.log(obj.name))
  .catch((err) => console.error("failed:", err));

// run several in parallel and wait for all
Promise.all([fetchUser(), fetchOrders(), fetchCart()])
  .then(([user, orders, cart]) => render(user, orders, cart));

10. async / await

Now standard JavaScript, async/await lets you write Promise-based code that reads like sequential code, with ordinary try/catch for errors. This is the idiom to reach for in new code.

async function loadProfile(id) {
  try {
    const user = await fetchUser(id);
    const orders = await fetchOrders(id);   // sequential
    return { user, orders };
  } catch (err) {
    console.error("loadProfile failed:", err);
    throw err;
  }
}

// independent calls? run them together, don't await one at a time
async function loadDashboard(id) {
  const [user, orders, cart] = await Promise.all([
    fetchUser(id), fetchOrders(id), fetchCart(id)
  ]);
  return { user, orders, cart };
}

A historical note for anyone reading older tutorials: you'll see the async npm library and its waterfall, parallel, race, and priorityQueue helpers. It predates native async/await. Today Promise.all replaces parallel, Promise.race replaces race, and sequential await replaces waterfall — you rarely need the library anymore.

11. Express

The built-in HTTP module is low-level. Express is the long-standing minimal framework that adds routing, middleware, and request/response conveniences on top — free, open source, and still the most common way to build APIs in Node.

const express = require("express");
const app = express();

app.use(express.json());            // parse JSON bodies (middleware)

app.get("/health", (req, res) => res.json({ ok: true }));

app.post("/users", (req, res) => {
  const user = req.body;
  res.status(201).json({ id: 1, ...user });
});

app.listen(3000, () => console.log("API on http://localhost:3000"));

Express is the default, not the only option. Fastify (faster, schema-first), Koa (from the Express team, async-first), and NestJS (opinionated, TypeScript-first) are worth knowing as you scale.

12. Common Mistakes

1. Blocking the event loop. A single synchronous CPU-heavy task — a big JSON.parse, a tight loop, readFileSync in a request handler — freezes every connection while it runs. Offload heavy work to worker_threads or a separate service.

2. Swallowing errors in callbacks. Error-first callbacks only help if you actually check the first argument. Ignoring err hides failures until they surface as something worse downstream.

3. Unhandled promise rejections. An async function that rejects with no catch can crash the process on modern Node. Always handle rejections, or wrap awaited calls in try/catch.

4. Awaiting independent calls one at a time. Three awaits in a row that don't depend on each other run sequentially and triple your latency. Use Promise.all.

5. Expecting Node to parallelize CPU work for free. "Non-blocking" is about I/O, not computation. Node won't magically use all your cores for a number-crunching loop — that's what worker threads or clustering are for.

13. The Takeaway

Everything distinctive about Node.js traces back to one idea: a single-threaded event loop that never blocks on I/O. Lean into that — asynchronous code, parallel awaits, non-blocking calls — and Node scales beautifully for the I/O-bound work most web services actually do. Fight it with synchronous CPU work on the main thread, and you'll wonder why one slow request stalled everything. Design with the loop, not against it.

About the author

I'm Atique Ahmed, Principal AI Architect — 7x Microsoft MVP and a Guinness World Record holder for Programming Excellence. I write about GenAI, agentic AI, and the systems that hold real applications together.

Find more at atiqueahmed.com · LinkedIn · GitHub